How to Froth Milk Like a Barista – Even Without a Frother
Learn the secrets to creating velvety, rich milk froth at home using simple tools and techniques. Elevate your coffee experience with barista-quality froth - no specialized equipment required!
Why Froth Milk?
Frothing milk transforms your ordinary coffee into a luxurious, café-style beverage. The light, airy foam enhances the texture and sweetness of the milk, perfectly complementing the rich, bold flavors of espresso. Whether you're a fan of lattes, cappuccinos, or macchiatos, mastering the art of milk frothing is essential for creating these delightful drinks at home.
"Frothing milk is not just about creating foam; it's about adding a touch of artistry and indulgence to your daily coffee ritual." - Coffee Aficionado
Understanding the Basics of Milk Frothing
Before diving into the techniques, it's essential to understand what happens during the frothing process. Frothing involves introducing air into the milk, which creates tiny bubbles. These bubbles are stabilized by the proteins and fats in the milk, resulting in a smooth, velvety foam. The temperature of the milk also plays a crucial role; ideally, milk should be heated to a temperature of around 140°F to 155°F (60°C to 68°C) for optimal frothing.
The Best Types of Milk for Frothing
While whole milk is traditionally the easiest to froth due to its higher fat content, you can achieve excellent results with other types of milk as well:
- Whole Milk: The gold standard for frothing, providing a rich, creamy foam.
- 2% Milk: A good alternative with less fat but still capable of producing a decent froth.
- Non-Dairy Milk: Options such as oat milk, almond milk (including barista blends), and soy milk can also be frothed, although the results may vary.
Experiment with different types of milk to find your personal preference and the one that works best with your chosen frothing method.
Frothing Milk Without a Frother: Simple Techniques
You don't need expensive equipment to create beautiful, creamy froth. Here are several effective methods you can try using standard kitchen tools:
1. The Whisk Method
A simple whisk can be surprisingly effective for frothing milk.
- Heat the Milk: Pour the desired amount of milk into a saucepan and heat it over medium heat until it reaches a temperature of around 150°F (65°C), which is hot but not boiling.
- Whisk Vigorously: Remove the milk from the heat and whisk it rapidly, using a back-and-forth motion. Continue whisking until the milk has doubled in volume and become light and frothy.
- Use Immediately: Pour the frothed milk over your espresso or coffee right away.

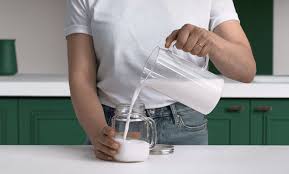
2. The Jar Method
This method is quick, easy, and uses a standard mason jar or any jar with a tight-fitting lid.
- Shake Cold Milk: Pour cold milk into the jar, filling it about one-third full. Seal the lid tightly.
- Shake Vigorously: Shake the jar vigorously for 30 to 60 seconds until the milk has increased in volume.
- Microwave: Remove the lid and microwave the milk for 30 to 60 seconds. Observe to ensure it doesn't boil over. The heat will stabilize the foam.
- Pour and Enjoy: Gently pour the frothed milk over your coffee.
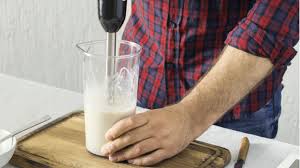
3. The Immersion Blender Method
An immersion blender can create a lovely froth with minimal effort.
- Heat the Milk: Heat the milk in a tall container or pot, ensuring it's warm but not boiling.
- Blend: Place the immersion blender into the milk at an angle. Start blending, moving the blender up and down until the milk becomes frothy.
- Finish and Serve: Once you've achieved the desired frothiness, pour it over your coffee.
4. The French Press Method
If you have a French press, you can also use it to froth milk.
- Heat the Milk: Warm the milk in a saucepan or microwave.
- Pour into French Press: Pour the warm milk into the French press, filling it about one-third full.
- Pump: Place the lid on the French press and pump the plunger up and down vigorously for about 30 to 60 seconds.
- Pour: Pour the frothed milk over your coffee.

Tips for Perfect Milk Froth
Here are some additional tips to help you achieve the best results:
- Start with Cold Milk: Cold milk generally froths better than warm milk.
- Temperature Matters: Aim for a milk temperature of around 140°F to 155°F (60°C to 68°C). Overheating the milk can result in a scalded taste and prevent it from frothing properly.
- Clean Equipment: Ensure your tools are clean and dry for optimal frothing.
- Practice Makes Perfect: Don't be discouraged if your first few attempts aren't perfect. Keep practicing, and you'll soon master the art of milk frothing.
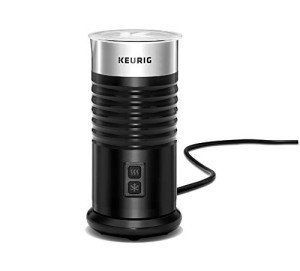
Keurig Frother for Non-Dairy Milk, Hot & Cold
Perfectly froths your favorite non-dairy milk for delicious coffee creations, hot or cold
Product information
$76.99
Product Review Score
4.56 out of 5 stars
96 reviewsProduct links
Troubleshooting Common Frothing Issues
Even with the best techniques, you might encounter some challenges. Here's how to troubleshoot common frothing problems:
- Thin, Watery Froth: This usually indicates that the milk wasn't frothed enough or was too hot. Try frothing for a more extended period and monitor the temperature more closely.
- Large Bubbles: Large bubbles can occur if the milk isn't agitated enough. Ensure you're using vigorous and consistent motions when frothing. Gently tap the container on the counter to break down large bubbles.
- No Froth at All: This could be due to using the wrong type of milk (e.g., skim milk can be challenging to froth) or not heating the milk to the correct temperature.
Elevate Your Coffee Experience
With these simple techniques, you can enjoy the creamy, frothy coffee!